Compose Multiplatform: 画面遷移ライブラリを評価する ④ Decompose Router編
Katz
KALEIDOT.NET

Compose MultiplatformでOSSライセンス表示を作る方法として現時点ではLicenseeとAbout Librariesを利用する方法があります。今回はLicenseeを利用してOSSライセンス表示画面を作る方法を記載していきます。
LicenseeはCash Appによって開発されているGradle Pluginです。Licenseeはアプリの依存関係を解析して、意図しないOSSライセンスが指定されているアーティファクトを誤って追加していないか、チェックできるツールです。
https://github.com/cashapp/licensee
Licenseeではチェックした結果をレポートとして出力してくれるのですが、そのなかのartifact.jsonにはアプリの依存関係に含まれる全アーティファクトのOSSライセンス情報を含めてくれます。
https://github.com/cashapp/licensee#usage
| レポート | 内容 |
|---|---|
| artifacts.json | アプリの依存関係の全アーティファクトのOSSライセンス情報を含むJSONファイルをレポートとして出力する。 |
| validation.txt | 各アーティファクトとそのOSSライセンスの利用が許可されているかチェックした結果をレポートとして出力する。 |
今回はLicenseeが出力してくれるこのartifacts.jsonを流用して、OSSライセンス表示を作成するというのやっていきます。
今回はCompose Multiplatform Wizardで生成したCompose Multiplatformプロジェクトをベースに実装を進めていきます。ちなみにCompose Multiplatform WizardでのCompose Multiplatformプロジェクトの作成はこちらの方法で進めています。
https://kaleidot.net/compose-multiplatform%e3%83%97%e3%83%ad%e3%82%b8%e3%82%a7%e3%82%af%e3%83%88%e3%82%92%e4%bd%9c%e6%88%90%e3%81%99%e3%82%8b/
OSSライセンス表示を作る際にはKotlin Serialization・Kotlin Coroutines・Licenseeのアーティファクトが必要になります。なのでVersionCatalogのtomlファイルに定義を追加した後に、build.gradle.ktsの依存関係にアーティファクトを追加してやります。
| 名称 | 役割 |
|---|---|
| Kotlin Serialization | artifacts.jsonのJSONデータをオブジェクトに変換するために必要 |
| Kotlin Coroutines | artifacts.jsonのJSONデータをIOスレッドで読み出すために必要 |
| Licensee | artifacts.jsonを生成するために必要 |
︙ 省略
licensee="1.7.0"
kotlinx-serialization = "1.5.1"
kotlinx-coroutines = "1.7.3"
︙ 省略

[libraries]
︙ 省略
kotlinx-serialization-json = { module = "org.jetbrains.kotlinx:kotlinx-serialization-json", version.ref = "kotlinx-serialization" }
kotlinx-coroutines-core = { module = "org.jetbrains.kotlinx:kotlinx-coroutines-core", version.ref = "kotlinx-coroutines" }
kotlinx-coroutines-android = { module = "org.jetbrains.kotlinx:kotlinx-coroutines-android", version.ref = "kotlinx-coroutines" }
kotlinx-coroutines-swing = { module = "org.jetbrains.kotlinx:kotlinx-coroutines-swing", version.ref = "kotlinx-coroutines" }
︙省略
[plugins]
︙省略
licensee = { id = "app.cash.licensee", version.ref = "licensee"}
kotlinx-serialization = { id = "org.jetbrains.kotlin.plugin.serialization", version.ref = "kotlin" }
︙省略
plugins {
︙省略
alias(libs.plugins.licensee)
alias(libs.plugins.kotlinx.serialization)
}
@OptIn(org.jetbrains.kotlin.gradle.ExperimentalKotlinGradlePluginApi::class)
kotlin {
︙省略
sourceSets {
︙省略
val commonMain by getting {
dependencies {
︙省略
implementation(libs.kotlinx.serialization.json)
implementation(libs.kotlinx.coroutines.core)
}
}
val androidMain by getting {
dependencies {
︙省略
implementation(libs.kotlinx.coroutines.android)
}
}
val desktopMain by getting {
dependencies {
︙省略
implementation(libs.kotlinx.coroutines.swing)
}
}
︙省略
}
}
LicenseeではどのOSSライセンスの利用を許可するか、許可しないか設定することができる仕組みになっています。今回の用途では許可するかどうかはあまり関係ないのですが、適切に許可しないとartifacts.jsonを生成する際にエラーが発生します。本プロジェクトでは主にApache-2.0とMITライセンスを利用しているのでbuild.gradle.ktsのlicenseブロックでApache-2.0とMITライセンスを許可するように設定しておきます。
licensee {
    allow("Apache-2.0")
    allow("MIT")
}
今回はlicenseeのセットアップ方法については本題にあまり関係がないので詳細については省きますが、セットアップ方法は以下のページに記載がありますので、必要に応じて確認してみてください。
https://github.com/cashapp/licensee#configuration
セットアップが完了したのでOSSライセンス表示の実装を進めていきます。OSSライセンス表示の実装ですが大まかに以下の手順で進めていきます。
artifacts.jsonを生成するartifacts.jsonのJSONデータを読み込むartifacts.jsonのJSONデータをオブジェクトにするartifacts.jsonを生成するLicenseeでは./gradlew checkを実行するとプロジェクトにしている各ターゲット用にartifacts.jsonを生成してくれます。今回のプロジェクトではAndroid・JVM・iOSX64・iOSArm64・iOSSimulatorArm64をターゲットに設定しています。なのでLicenseeは以下のように各ターゲットごとのartifacts.jsonを生成するようになっています。
| OS | パス | 内容 |
|---|---|---|
| Android | composeApp/build/reports/licensee/androidRelease/artifacts.json | Androidアプリ向け |
| JVM | composeApp/build/reports/licensee/desktop/artifacts.json | デスクトップアプリ向け |
| iOS X64 | composeApp/build/reports/licensee/iosX64/artifacts.json | x86-64プラットフォームで動作するiOSシミュレータ向け |
| iOS Arm64 | composeApp/build/reports/licensee/iosArm64/artifacts.json | ARM64プラットフォームで動作するiOS・iPadOS向け |
| iOS SimultorArm64 | composeApp/build/reports/licensee/iosSimulatorArm64/artifacts.json | Apple Siliconプラットフォームで動作するiOSシミュレータ向け |
というようにLicenseeはartifacts.jsonを生成してくれるので、このartifacts.jsonをコピーしてCompose Multiplatformのresourceとして取り扱えるようにするupdateLicenseというタスクを定義します。
enum class LicenseFile(
    val from: File, val to: File
) {
    Android(
        from = File("composeApp/build/reports/licensee/androidRelease/artifacts.json"),
        to = File("composeApp/src/commonMain/resources/licensee/android/artifacts.json")
    ),
    IOSX64(
        from = File("composeApp/build/reports/licensee/iosX64/artifacts.json"),
        to = File("composeApp/src/commonMain/resources/licensee/iosX64/artifacts.json"),
    ),
    IOSArm64(
        from = File("composeApp/build/reports/licensee/iosArm64/artifacts.json"),
        to = File("composeApp/src/commonMain/resources/licensee/iosArm64/artifacts.json"),
    ),
    IOSSimulatorArm64(
        from = File("composeApp/build/reports/licensee/iosSimulatorArm64/artifacts.json"),
        to = File("composeApp/src/commonMain/resources/licensee/iosSimulatorArm64/artifacts.json"),
    ),
    JVM(
        from = File("composeApp/build/reports/licensee/desktop/artifacts.json"),
        to = File("composeApp/src/commonMain/resources/licensee/desktop/artifacts.json"),
    )
}

tasks.register("updateLicense") {
    doFirst {
        LicenseFile.values().forEach { item ->
            item.from.copyTo(item.to, true)
        }
    }
}.dependsOn(tasks.check) あとは./gradlew updateLicenseでupdateLicenseタスクを実行するだけです。updateLicenseタスクを実行するとLicenseeがartifacts.jsonを生成して、最終的にCompose Multiplatfromのresourceに登録されます。Compose Multiplatformのresourceに登録されるとaritfacts.jsonをアプリから読み取れるようになります。
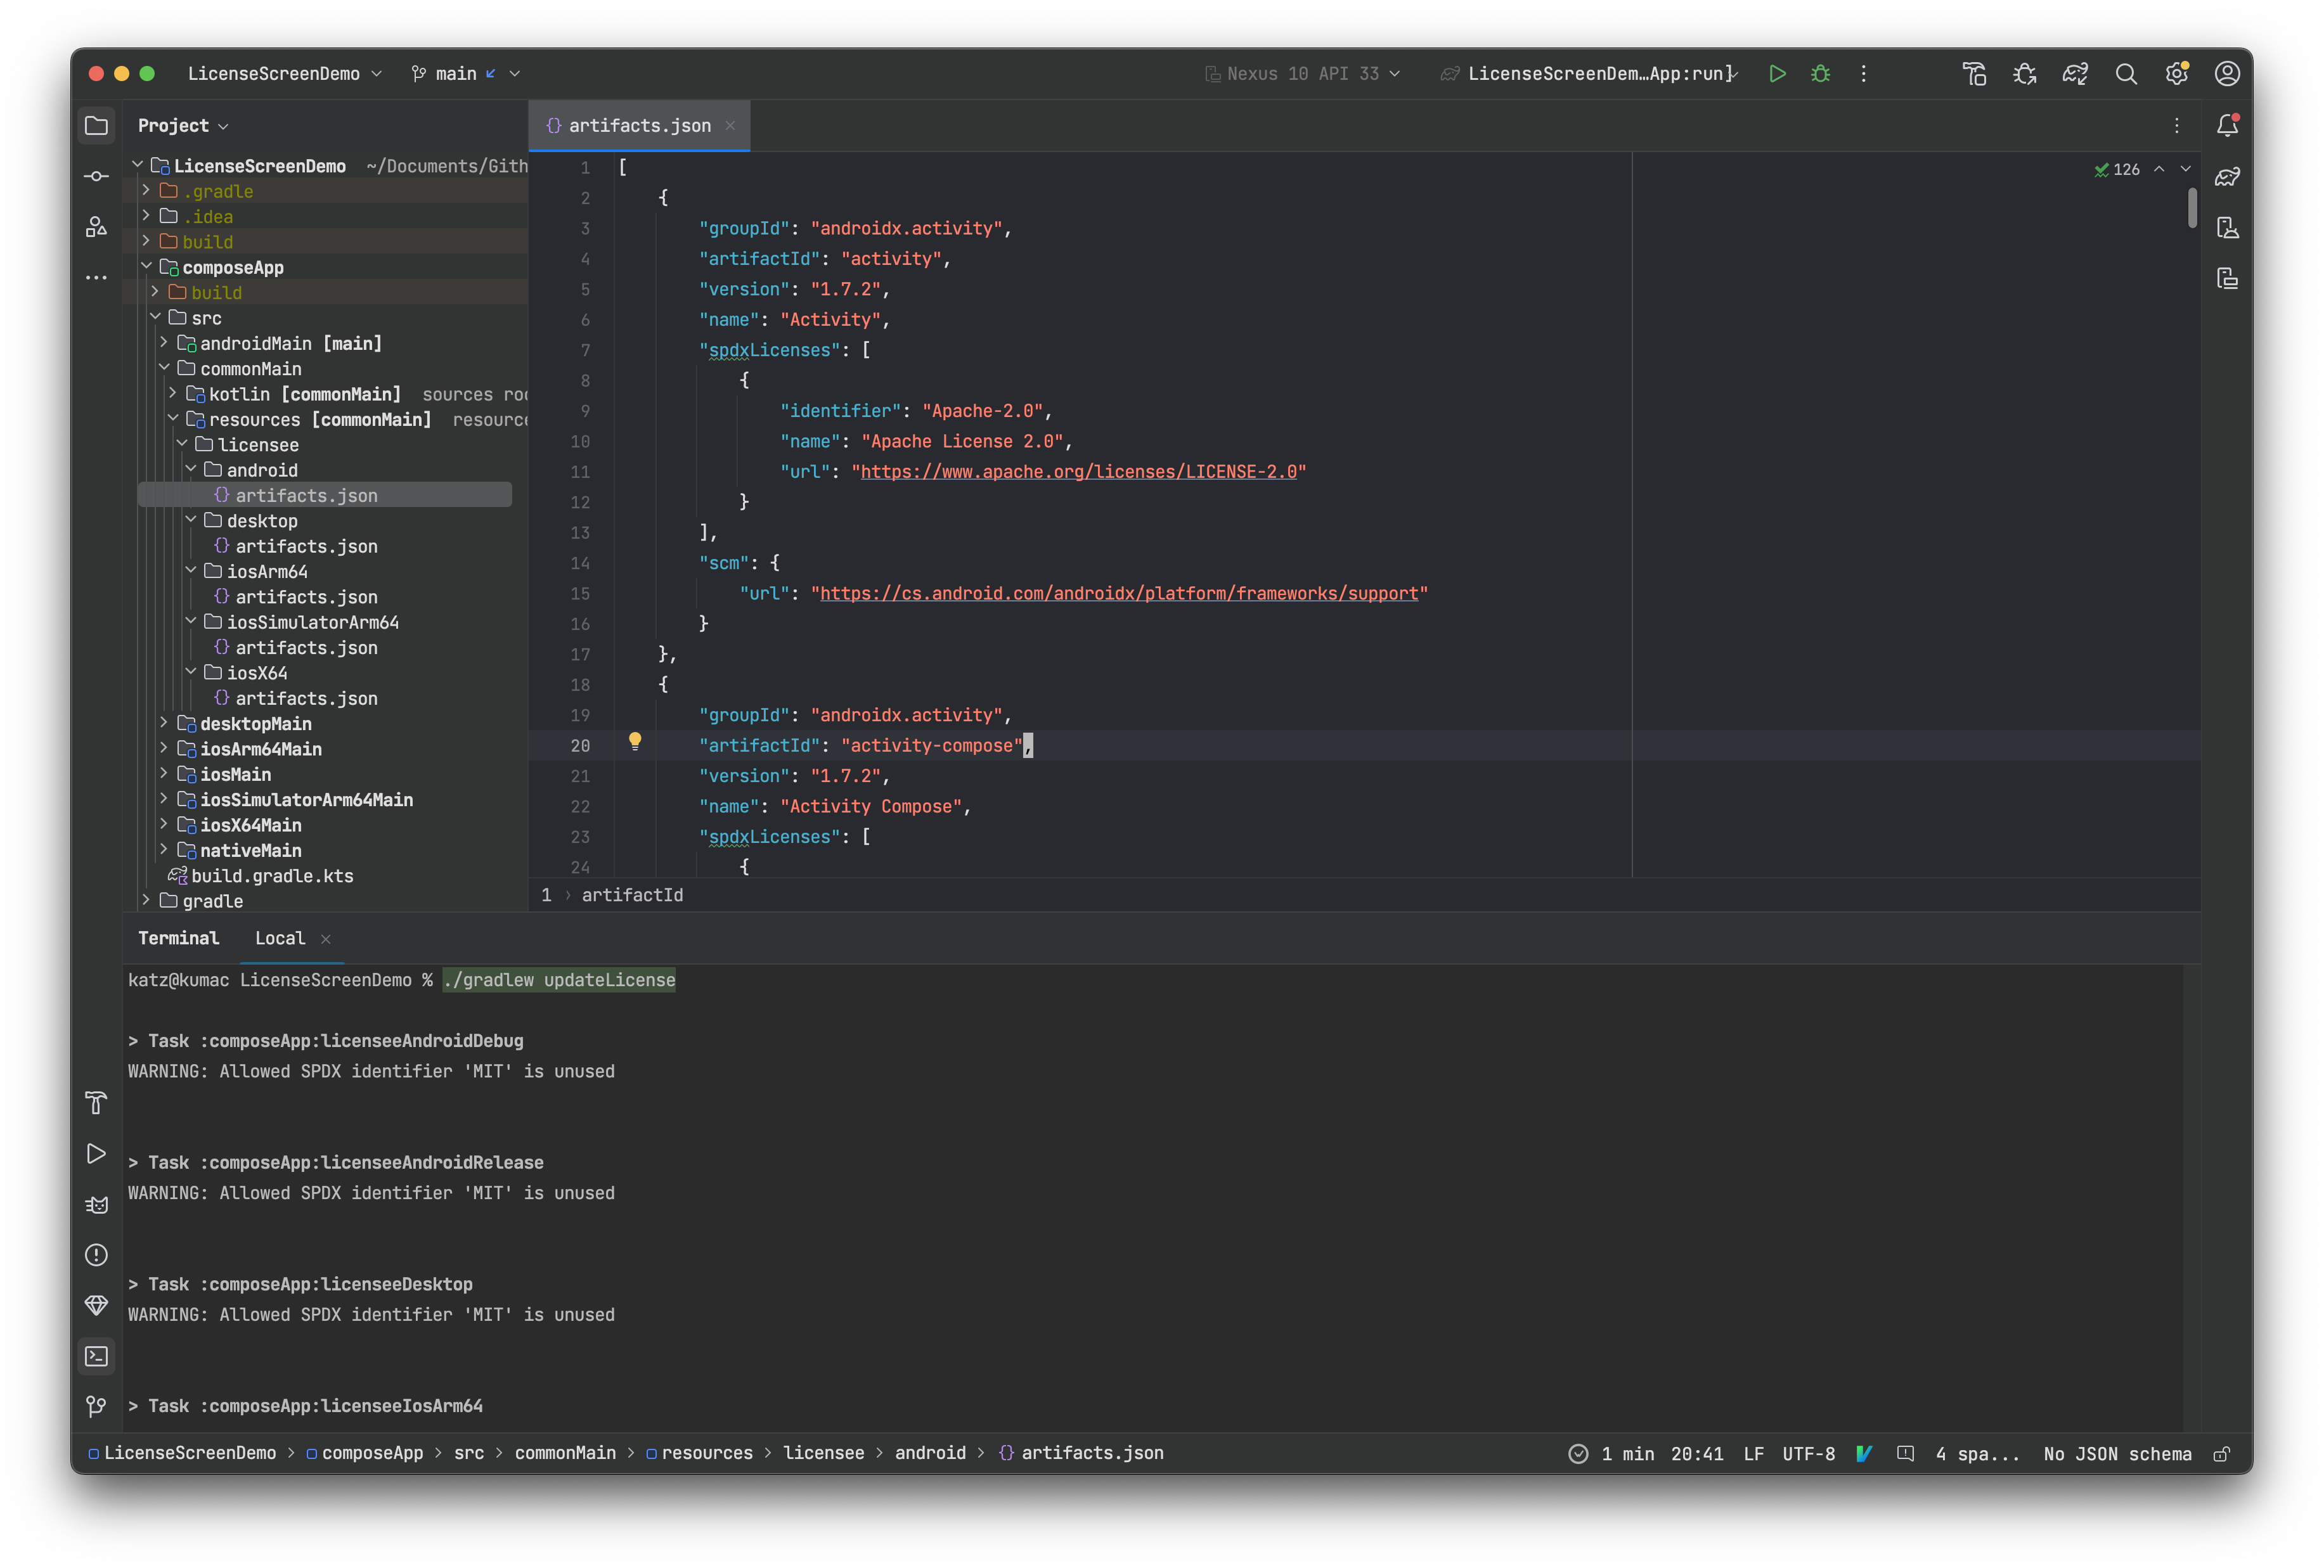
aritfacts.jsonartifacts.jsonのJSONデータを読み込むCompose Multiplatformではresourceディレクトリに登録したファイルをresource(path: String)でリソースとして取得する仕組みが用意されています。通常はresource(path: String)に単一のパスを指定してリソースを取得すればよいですが、今回は各ターゲット向けに用意されたartifacts.jsonのリソースを取得する必要があります。
fun resource(path: String): Resource なのでresource(path: String)を利用して、各ターゲット向けのartifacts.jsonのリソースを取得できるように、getLicenseResourceという関数をexpectとactualを利用して定義します。
expect suspend fun getLicenseResource(): Resourceactual suspend fun getLicenseResource(): Resource = resource("licensee/android/artifacts.json")actual suspend fun getLicenseResource(): Resource = resource("licensee/desktop/artifacts.json")actual suspend fun getLicenseResource(): Resource = resource("licensee/iosX64/artifacts.json")actual suspend fun getLicenseResource(): Resource = resource("licensee/iosArm64/artifacts.json")actual suspend fun getLicenseResource(): Resource = resource("licensee/iosSimulatorArm64/artifacts.json")このようにgetLicenseFileを利用してリソースを取得するとターゲットが変われば読み込むartifacts.jsonが変わるというのを実現できます。ちなみにgetLicenseFileから取得したリソースですが以下のようなコードを記述するとartifacts.jsonからJSONデータを簡単に読み出すことができます。
val text = getLicenseResource().readBytes().decodeToString()
println(text)artifacts.jsonのJSONデータをオブジェクトにするartifacts.jsonからJSONデータを読み出すことができたら、あとはJSONデータをデシリアライズして、OSSライセンス情報を表示するだけです。artifacts.jsonには以下のようなJSONデータが含まれているので、このJSONデータをデシリアライズできるようにしていきます。
  {
        "groupId": "androidx.activity",
        "artifactId": "activity",
        "version": "1.7.2",
        "name": "Activity",
        "spdxLicenses": [
            {
                "identifier": "Apache-2.0",
                "name": "Apache License 2.0",
                "url": "https://www.apache.org/licenses/LICENSE-2.0"
            }
        ],
        "scm": {
            "url": "https://cs.android.com/androidx/platform/frameworks/support"
        }
    },
     ︙ 省略
  }
上記のJSONデータはKotlin Serializationでデシリアライズするので、JSONデータの各要素を格納するLicense・Scm・SpdxLicenseというデータクラスを定義してやります。
@Serializable
data class License(
    val artifactId: String,
    val groupId: String,
    val name: String,
    val scm: Scm,
    val spdxLicenses: List<SpdxLicense>,
    val version: String,
)

@Serializable
data class Scm(
    val url: String,
)

@Serializable
data class SpdxLicense(
    val identifier: String,
    val name: String,
    val url: String,
)
あとはJSONデータからOSSライセンス情報を取得する処理をKotlin Serializationで実装してやれば良いです。ちなみにwithContext(Dispatchers.IO)を呼び出していますがこれはJSONデータを呼び出す際にUIをスレッドをブロッキングしないように切り替えてやっています。
suspend fun readLicenses(): List<License> {
    return withContext(Dispatchers.IO) {
        val text = getLicenseResource().readBytes().decodeToString()
        Json.decodeFromString<List<License>>(text)
    }
}artifacts.jsonからOSSライセンス情報を生成できるようになったので、あとはOSSライセンス情報表示する画面を組み立てるだけです。今回は以下のようなリストとカードでOSSライセンス情報を表示する画面を作成してみました。
@Composable
internal fun App() = MaterialTheme {
    var isLoading by remember { mutableStateOf(false) }
    var licenses by remember { mutableStateOf(emptyList<License>()) }

    LaunchedEffect(isLoading) {
        if (isLoading.not()) {
            licenses = readLicenses()
            isLoading = false
        }
    }

    Box(
        modifier = Modifier
            .fillMaxSize()
            .windowInsetsPadding(WindowInsets.safeDrawing)
    ) {
        if (isLoading) {
            CircularProgressIndicator(
                modifier = Modifier.align(Alignment.Center)
            )
        } else {
            LicenseList(
                licenses = licenses,
                modifier = Modifier.fillMaxSize()
            )
        }
    }
}

@Composable
fun LicenseList(
    licenses: List<License>,
    modifier : Modifier = Modifier,
) {
    LazyColumn(modifier) {
        licenses.forEach { license ->
            item { LicenseCard(license) }
        }
    }
}

@OptIn(ExperimentalLayoutApi::class)
@Composable
fun LicenseCard(
    license: License,
) {
    Card(
        modifier = Modifier.fillMaxWidth().padding(8.dp),
    ) {
        Column(
            modifier = Modifier.padding(8.dp),
        ) {
            Text(text = license.name, style = MaterialTheme.typography.titleMedium)
            Text(text = license.artifactId, style = MaterialTheme.typography.titleSmall)
            Text(text = license.version, style = MaterialTheme.typography.titleSmall)
            FlowRow {
                license.spdxLicenses.forEach { spdxLicense ->
                    ClickableText(
                        buildAnnotatedString {
                            append(spdxLicense.name)
                            addStyle(
                                style = SpanStyle(
                                    color = MaterialTheme.colorScheme.primary,
                                    textDecoration = TextDecoration.Underline,
                                ),
                                start = 0,
                                end = spdxLicense.name.length,
                            )
                            addStringAnnotation(
                                tag = spdxLicense.name,
                                annotation = spdxLicense.url,
                                start = 0,
                                end = spdxLicense.name.length,
                            )
                        },
                        onClick = {
                            openUrl(spdxLicense.url)
                        },
                    )
                }
            }
        }
    }
}
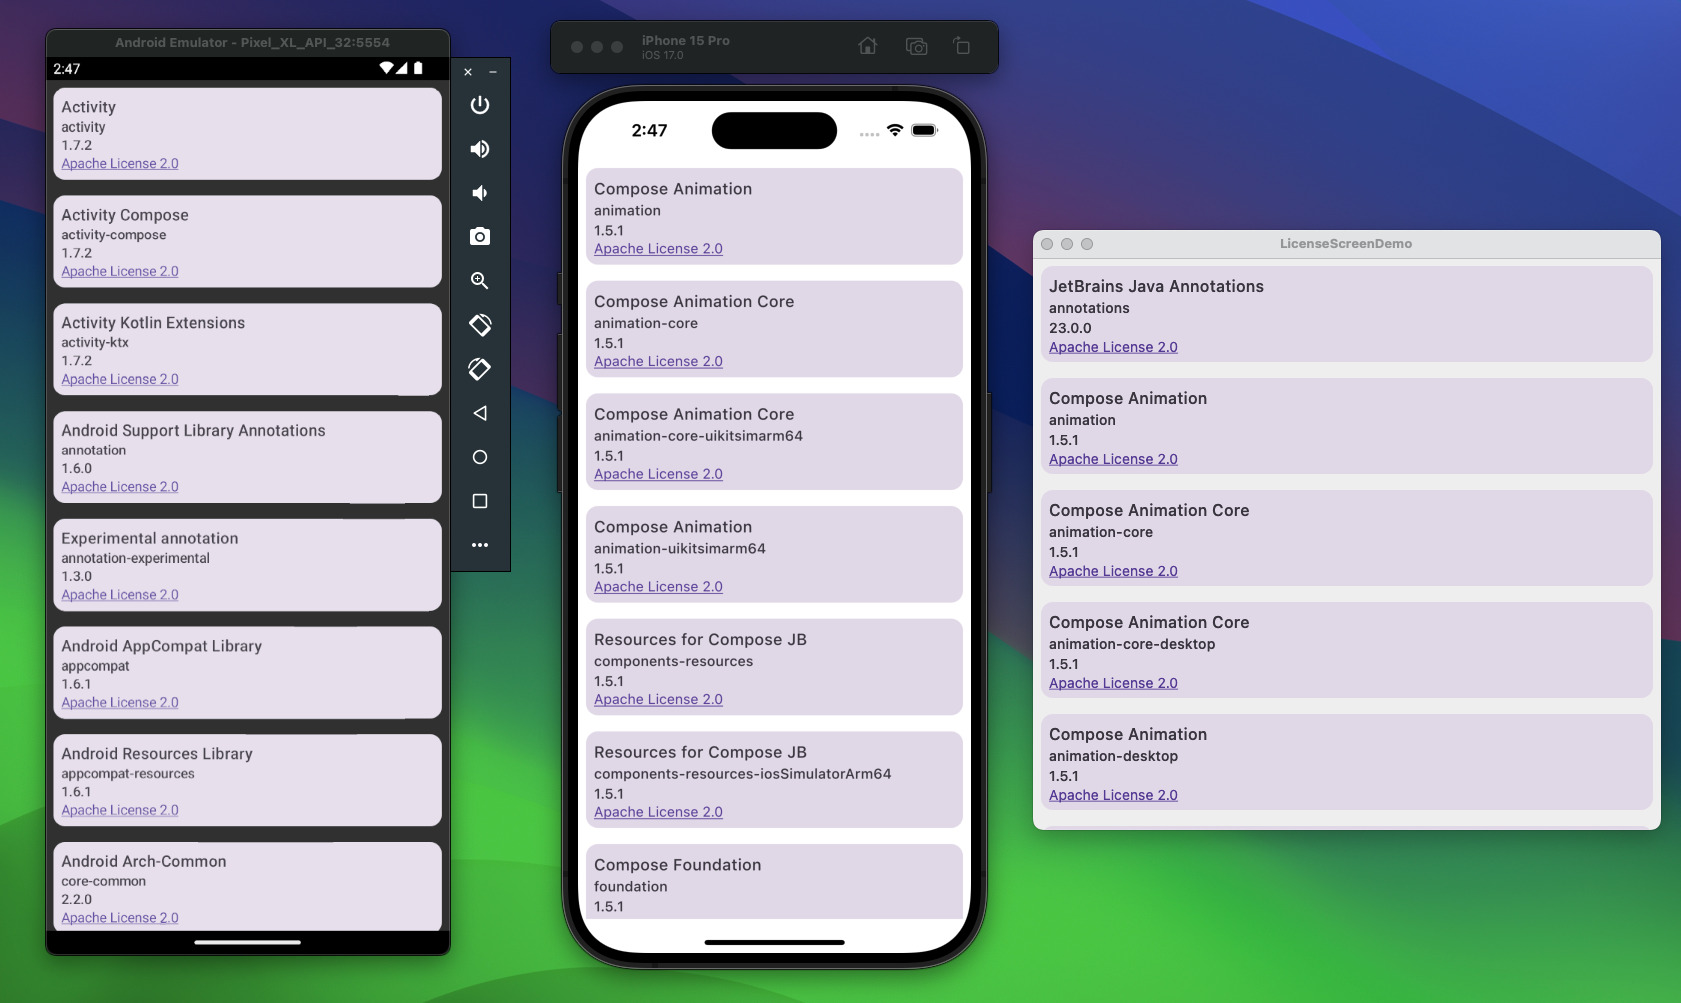
アプリを起動してみると以下のようにOSSライセンス情報が表示されます。内容についても確認してみるとAndroid・iOS・JVMで異なるアーティファクトが表示されているのでそれぞれのターゲット向けのartifacts.jsonがうまく読み出せていそうです。
Compose Multiplatformはまだまだ開発途中ということもありOSSライセンス表示を作るのも一苦労です。幸いにもLicenseeというCompose Multiplatformで利用できるツールがあったので良かったかなと思います。
Compose Multiplatformではこのようにつまづくポイントが沢山あるのですが、一つ一つ解決していこうと思うのでまたこのような形で解決方法を紹介することができればなーと思います。